Wednesday 12 October 2016

D-Star setup for dummies, Part 5

In this post I am going to talk about modules and reflectors but only in a basic way, there is far too much about them that could be said but most of it is far more that any of you (or me) are ever likely to need or want to know.

Modules

Each repeater will have at least one module however they could have many more. A module is in simple terms a repeater in it's own right that can be connected to any reflector module via the internet.
I guess it's a good idea that I first talk about the naming convention for repeater and reflector modules.

Module A:

This module is generally used for 1.2GHz operation, it is also the module that is used for data modes as it has a higher bandwidth allocation which is needed for such data transmissions. However very few repeaters will actually have this module fitted due to the expense, limited usage, limited range of transmission and logistics of antennas. Maybe sometime in the future as demand grows more repeaters will implement this as part of the repeater setup.

Module B:

This module is generally used for UHF 430-440MHz operation and is a voice only operation module. It can be argued that even the voice only modules are data modules as well because things like callsign, user messages and GPS data is also transmitted, but to all intents and purposes it is a voice only module.

Module C:

This module is the same as module B with the exception of operating in the 144-146MHz band.


Reflectors

As I gleaned over the subject of reflectors earlier, reflectors can be thought of as chatrooms in a way. They serve as a means of communication obviously, but what they really do is allow certain types of conversation (language or subject) to be kept separate from the general chit-chat rag-chew reflectors.
A couple of examples to show you what I mean:

REF001C is called the mega reflector where everyone from anywhere will generally connect and talk about just about anything. These conversations can be as simple as just signal/setup reports, nets or just a place to chit-chat. REF001C is also the place where you are almost guaranteed to be able to have a QSO of some kind or another at any time day or night.

REF017A is a "Netherlands (Dutch Speaking repeaters,hotspots and dongles)" reflector where they obviously expect you to speak Dutch instead of English.


REF010A is designated for "Emergency Communications" so they wouldn't take it too kindly to you connecting and just shooting the breeze.

Here is as far as I can tell a full and up to date list of all of the D-Star reflectors and their general usage.
http://www.dstarinfo.com/reflectors.aspx


A common misconception about modules and reflectors

I have heard several people say that you can only connect to a reflector say REF001C if you are using module C on your local repeater. THIS IS NOT TRUE! There is nothing stopping you from connecting to REF001C or ANY other reflector from ANY module on the repeater, However there is one caveat to that. There is no point in connecting from module B or C to a reflector on module A if that module is used for data communications, it just doesn't work and will most likely cause interference as modules B and C are not designed to carry that kind of bandwidth. So go ahead and connect from a B module to a C reflector or vise versa if you wish to do so, it can be in your interest to do so if say your radio is UHF only and you want to connect to a VHF reflector.


With that all said, I will now link to a couple of resources that will further reinforce the information I have given you and also go into some areas in more detail than I can here and also recap some of the information.

Registration:
http://dstarusers.org/repeaters.php
Find your local repeater and see if they offer registration.

If not, here is one that does.
https://gb7jh.wadarc.org.uk/Dstar.do

Reflectors:
http://www.dstarinfo.com/reflectors.aspx

Memory programming files:
http://downloads.d-staruk.co.uk/


A 3 part seminar on D-Star

Each part is about an hour long, but they are really worth watching. They helped me tremendously in getting my head round all the information and helped me put it all into practice.

Part 1 of 3


Part 2 of 3


Part 3 of 3


Well I think that nicely wraps up my posts on "D-Star for dummies" and with any luck you are now well on your way to becoming a D-Star pro.


As always please contact me with any comments on this series such as your opinion of it, where I can improve it and all of the mistakes I have probably made.
My contact info can be found in the full "About me" page

Hope to speak to you on D-Star very soon

All The Best 73's

Paul
M0CNL


D-Star setup for dummies, Part 4

This will be a fairly short post, but it will contain some of the more important D-Star commands available to you. These are some of those shortcuts that I was talking about when we were programming the radio with the icf file that we downloaded and programed our radio with in Part 2

Let me start with a term that you will often hear, "Quick key"
All this is is just like it sounds, just keying your radio for a second or less. This serves a few purposes:
1. Sends whatever command you are sending to the repeater.
2. It also lets other people know that you are there.
3. If the is a conversation going on and you would like to "break in", instead of waiting for a long enough gap for you to key up and say "Break gentlemen please" you just need to wait until the QSO is being handed over to the other person and in that sometimes all too short interval you can just Quick key and they will see you appear on their screen and "should" let you in.


Firstly some of those commands like "U", "L", "I" and "E".

First lets start with "E"

"E" stands for "Echo" and is a very important but sadly underused command. What "E" does is allow you to transmit to the repeater and when you de-key the repeater will play back whatever you said exactly as the repeater heard you.
This is very important for several reasons.
1. You can tell how well you are making it into the repeater particularly if the repeater is on the edge of your coverage. You can often tell if the repeater is just too far out of range or if you need to turn up your power a little to access it properly.
2. You will be able to hear exactly how you will sound to other people on the network.
3. Are you too quiet.
4. Are you too loud.
5. Are you overdriving your audio.
6. Is your audio garbled (R2-D2)
etc. etc.

So you can see why I started with this command and why you should make use of it.

I will show you how to access these commands at the end of this section as there is no point in me repeating almost the same information over and over as they are all within the same section of the menu.

Now lets continue with "I"

"I" stand for Information (yes quite obvious really) sometimes referred to as Repeater Status.

What this will do is when you Quick key the repeater will both by voice and via a message on your screen give you information about that repeater such as it's website. This website can be very useful in that all repeaters should have one that will give you a quick overview of it's current status including:
1. It's modules.
2. Reflectors it is connected to (if any).
3. Stations heard, when and their status message.

An example of my local repeater is given here (unfortunately I picked a very quiet time to take this screenshot)


Here we can see that Module C (I will talk about modules later) is linked to reflector REF001C.
The last few callsigns that were heard by the repeater.
The user messages that those callsigns transmitted.
Which module they were last heard on.
The date and time that they were last heard.

And lastly at the bottom when this information was last updated. This information is usually updated every 10-30 seconds depending on the repeater keepers setup.

Now let's continue with "U"

"U" stands for unlink, so if I am talking to the repeater on module C and send a "U" command then the repeater will unlink from any reflector it is connected to on that module.

A polite word about unlinking and linking.
It is considered polite to announce your intention to unlink a module BEFORE you do it. Someone may be listening on that reflector or waiting for a scheduled contact with someone who will be coming through that reflector. So please if you intend to unlink a reflector, announce your intention to do so and wait for a minimum of 30 seconds so as anyone can reply before you actually unlink the reflector.

It is also worth checking with your local repeater keeper whether they mind you leaving the reflector linked or if they would prefer you to unlink when you have finished using it. I have to say this here that my local repeater keeper is very good on this subject and is happy for you to leave the reflector linked as long as you like (Thank you Tony G0MBA). Having said that, the software running on the repeater will usually be running a timer that will disconnect the reflector after a period of time if it is unused, however a Quick key will restart that timer again if you do it before it has timed out. Some other repeaters will by default connect to a specific reflector after a period of inactivity (usually reflector REF001C from what I have seen).

Now we get to "L"

"L" is probably the most misunderstood yet most powerful of commands you can send to the repeater.

"L" as you might have already guessed is for linking a module on the repeater to a reflector. However unlike the previous commands it cannot be sent on it's own, you must tell the repeater where you want that module to connect to. What you will be wanting to connect to is a reflector, so the command would look something like this:
REF001 CL
What this is telling the repeater is that you want to connect to REFlector 001 module C and L is the link command.
Now all you need to do is a Quick Key and the repeater will respond with a voice message and screen message telling you whether you have been successful or not.

Now this may seem confusing at first but it really isn't especially if you have programmed your radio using the resource that I showed you previously as all of these are programmed into your radios memories and are only a couple of presses away.

Here is a quick example using screenshots on my radio.

In this example we will connect the repeater module C to REF001C

1. Click/press Use Repeater


This will bring up this menu


Now this may seem counter intuitive (well it does to me) but click/press on "Your Call Sign"
This will bring up a menu with all of the programmed reflectors and a few shortcuts at the start.
Scroll down to to this entry.


Now press/click on the entry that I have highlighted.
This will bring you back to this screen.


Now all you have to do is Quick Key and the repeater will respond with a message which in essence will tell you if you were successful or not.

If you were succesful you now need to change the "TO" field back to "Use Repeater" which is done in the same way as selecting the reflector except you select the first option "Use Repeater" with "CQCQCQ" just below it as seen here.


Click/press on the highlighted option and you will be taken back to the main screen and are ready to talk via your repeater and through the reflector to any other repeater connected to that reflector as seen below.


I am going to save talking about modules and reflectors until the next post as this one has got long enough without adding that information as well and it is probably best that it has it's own section anyway.


As always I would appreciate any comments you do have.

All The Best 73's
Until next time

Paul
M0CNL


D-Star setup for dummies, Part 3

Ok so now you know the basics of the D-Star system I hope in this post to tie it all together and get you up and running as easily and simply as possible.

I will be doing this mostly with pictures taken of the screen of my icom IC-7100 but the process will be very similar for any other icom radio at least and maybe even other makes of radio that are starting to make D-Star compatible radio. Sorry about the quality of the pictures but it isn't easy to get high quality images in the time constraints I have without getting the reflection of the lights behind me, and they show up every speck of dust in the radio even though I dusted it beforehand.

Firstly you need to put your radio into digital mode which can be done in a couple of ways but the easiest way on the 7100 is by pressing the DR button just below the screen.


I have highlighted the button I mean here with a red "circle" around it.

Next we need to choose our local repeater that we intend to use.
Please ignore that my radio is already setup to use this repeater.
We select the repeater we want to use by touching the screen where in my case it says "CLACTON ON SEA" which is the from field.


This will then bring up a menu where you will use one of two options depending on whether you have a GPS device attached. I am going to go through the process as if I don't but will add a note for those of you that do.


Here we will select "Repeater List" which will then bring up a further menu.
If you have GPS attached you can use "Near Repeater" which will bypass the next step.


As the repeater I intend to use is a 2m UK repeater I will select option "03:"
This now presents us with a further menu.


Here I have scrolled through the list until I found the repeater I want to use which in this case is "GB7TE"
I then press the screen on the repeater I want to use and now the "FROM" field is populated with all the information for that repeater as can be seen below.


Now as I want to be heard on any other repeater that the repeater is connected to via a reflector I need to setup the "TO" field.
Don't worry if your repeater is not connected to a reflector as I will cover that later as in this section I am concentrating on getting you setup to use the repeater.

Where it says "Use Repeater" which in my case here is already setup but we will be supposing it isn't.
So press the screen where it says "Use Repeater" and you will see a new menu.


Here you will click/press on "Your Call Sign" which brings up another menu.


Here we want to use the repeater so we click/press on "Use Repeater"
Don't worry about the other options as I will explain those in a later part.
We will now be brought back to our main screen and are now all setup to use this repeater and for our "signal" to go out over any other repeater that this one is connected to via a reflector.

Here is what your screen should look something like.


Now you are ready to use the repeater and any reflector it happens to be connected to.
In the next part I will be showing you some of the more useful commands that you can send to the repeater that will help you or help connect you via different reflectors.

I hope you have found this series useful so far and as always if you have any comments or questions then please feel free to contact me and I will do my best to help you.
My contact details can be found on the full about me page.

All The Best
73's
Until the next part
Paul
M0CNL


Monday 10 October 2016

D-Star setup for dummies, Part 2

Continuing from my first post in this series on getting started in D-Star for dummies in this post I intend to cover programming memories for all of the VHF/UHF repeaters both analogue and D-Star. I also want to introduce reflectors and what they are and how they can be useful in making contact to different parts of the world and which one is the general all covering reflector where you will always find someone from anywhere in the world to chat with.

This post should be quite short as I will be linking you to a couple of great resources that will make your life infinitely easier than programming your radio by hand.

Firstly, make a backup of your radios SD card. Yes I know I have already said this before but it is important because you can easily mess it up, particularly when you are just starting out or even when you are a seasoned pro. SD cards have a limited lifetime and although you are not likely to ever reach that during normal operation failures do happen. If you have kept a backup or several backups like I have suggested then you will never lose too much information or time setting up your radio from scratch.

Programming your radios memories

If you have ever programmed your analogue radio for a few local repeaters you will know just how time consuming that can be. What if I told you that for each D-Star repeater there are almost double the amount of setting to input and then times that by the couple of hundred VHF repeaters and again by the same again for the UHF repeaters. Now times that by all of the repeaters worldwide and you can see why you could easily spend several months programming them and still only be part way through them. Now to make that even worse you have to program all of the reflectors which currently stands at about 150 if you include the modules (rough guesstimate). You see the enormity of the task !

What if I said you could do all of the above in just a couple of minutes ! Sounds too good to be true, but it is and here is how.
I have seen many radio shops and people on ebay charge you about £15 for a £2 SD card with exactly the same information on (often out of date or incomplete) as I am going to tell you how to get 100% legally and for FREE! (except the cost of your SD card of course).

Firstly goto this site http://downloads.d-staruk.co.uk/
Here you will find icf files and csv files for your icom radio.
icf files contain everything for your radio with one exception, your callsign which your manual will tell you how to enter.
csv can be imported into the programming software but only contain the repeater information.

Importing icf files is probably different for different icom radios, but in my case with the 7100 there is a folder on the SD card called IC-7100 and under that one called Setting. You place the icf file in that Setting folder, put the card into the radio and then from your radio menu import the settings.
Now your radio is programmed with all of the VHF/UHF analogue and D-Star repeaters, a sample (several hundreds) of the worldwide D-Star repeaters (in sections by continent) the current reflectors, their modules and a few VERY useful shortcuts to common tasks.
There is a "guide" on how to use those icf and csv files on the site listed above, but in all honesty you are better off checking in your manual. For the IC-7100 it is covered on pages 4-2  of the instruction manual for setting your callsign and 13-8 of the Advanced instruction manual for importing icf files.

Now I know that that was a very quick overview of the subject, but I can't cover every radio out there, but it should be enough to get you going or on the right track without all of the tedious days, weeks or months of basic repeater/reflector programming you would have to go through.

Reflectors, what are they ?

I guess the best way of describing a reflector is saying it's like a public chat-room where anyone on D-Star can join via their repeater (dongle etc).
This is also where the controversy about digital modes like D-Star, DMR and Fusion come into play as it's not "real radio".
What happens is you connect your repeater module (dongle etc) to a reflector and anyone else anywhere in the world does the same via their repeater or dongle. The actual connection between repeaters/dongles and other repeaters/dongles is done via the internet (hence the not real radio debate). So when you talk via your local repeater which is connecterd to a reflector you can be heard on any other repeater anywhere else in the world that is also connected to that same reflector.
It goes a bit like this in a simplified way:

(You)<->(Local repeater)<->(Reflector on the internet)<->(Distant repeaters)<->(Other Hams)

Yes that is an overly simplified version of what is happening, but it does give you the basic idea behind what is going on. There can be many repeaters connected to a reflector, so you could be talking to someone in Australia, USA, Japan, Korea in fact anyone anywhere all at the same time and almost always at high quality audio with the exception of the occasional R2-D2 (You will know what I mean when you hear it).

But what is a reflector ?

A reflector is a computer usually in a very high bandwidth server farm located at geographically strategic places across the world, the same type of computer/server that could be hosting your website, email etc somewhere remotely from you in places like London, Japan, Italy, Amsterdam etc.

Ok so now for a list of reflectors and what each is generally used for.
I'm not going to list them here as my list would soon become out of date and why replicate something that has already been done very well and is (to my knowledge) kept pretty much up to date.

http://www.dstarinfo.com/reflectors.aspx

Now the most commonly used general reflector is REF001C where you will always find someone from some far flung corner of the world or just down the road to talk to.

Well I think that that is enough for part 2 of this blog post on D-Star for dummies.
Part 3 will be on it's way fairly soon where we will be tying all this info together.
Practical advice on how to use the info you have learned and more.

73's
Paul
M0CNL

Sunday 9 October 2016

D-Star setup for dummies, Part 1

Please don't take offense at the title of this post, it's just a reflection of how I felt when I was trying to setup my registration and radio so as I could use this great mode of communication.

This will be a long post and will be broken up into several parts and I make no apologies for that as there is a lot of information to cover and explain adequately to make it easy to understand.

Why am I writing this when there is already information out there?
Well, I spent hours searching and all of the information I could find seemed to be written for people already familiar with all of the terms, each part was on different websites or so jumbled up it made your head spin trying to take it all in. Both of the manuals that came with my radio just didn't help at all, not the normal user manual (96 pages) or the advanced manual (375 pages) covered the basic getting started, yes they help once you know what's going on but not if you know nothing at all. They also seemed to use different terms to what everyone else uses which made it all the more confusing.

What I plan to try to do is walk you through the steps on how to get up and running on D-Star as simply and easily as I can make it. Have all of that information in one place in easy to follow steps with an explanation and picture where possible of each step. I will also provide links to what I would call vital resources and also resources that will make your life a whole lot easier in the long run.
I am not by any means an expert on this, but this is an amalgamation of all of the info I found with the misinformation taken out and explanations added where I found the 30 or so websites I used were lacking.
Please feel free to contact me with any errata or where I need to add more information.

I will be basing this on my own icom IC-7100 with screenshots, but it should be the same or very similar for any icom radio.

FIRST AND MOST IMPORTANT STEP

BACKUP you radio's SD card onto your computer before you do anything!
This may sound stupid or obvious, but if anything does go wrong you will always have a known good or default configuration to revert to if you mess things up beyond your ability to put it right. I suggest you keep several backups, one at each stage of any changes you have made to the radio side of the setup process.

REGISTRATION

Yes you have to register on the D-Star network (It is free to do so), but I bet they didn't tell you that when you bought your radio nor did they tell you how or where to do it or even why you need to register.

Why register?
Yes you can use D-Star without registering, but and it is a big but, you will only be able to talk simplex or via a repeater locally even if that repeater is linked to a reflector (more about reflectors later) you will only be heard locally in the same way that an analogue repeater works (non echolink). So if you want to be able to use the full features of D-Star then you must register on the D-Star network. This must only be done once and once only, and only ever needs to be done once (it will cause problems if you register more than once).

Ok so how do I register on the network?

Step 1.

This is a simple process but it can take a few days (1-3) to get your registration approved as it is done by volunteers. They get no notification that anyone new has made a new application so have to manually check the system to see new applications and approve them (if you have filled out the registration form correctly) so please be patient and check back once or twice a day to see if you have been approved. This is a 3 step process of which two parts are down to you and one is down to one of the volunteers to get you fully registered and able to take full benefit of all that D-Star has to offer.

Whilst it is advisable to register on your local repeater, not all repeaters offer this registration service and it is not essential to register on that repeater as you will see later.

Firstly go to http://dstarusers.org/repeaters.php and find your local repeater and look to see if they offer registration but note that very few actually do so don't be surprised if yours doesn't, just find one that does.

Here is a link to the first one I could find that does. https://gb7jh.wadarc.org.uk/Dstar.do
NOTE: The D in Dstar MUST be a capital D !

You WILL get a security warning which is normal for all of the ones I have seen, just add an exception and continue to the site.

This is what the security warning looks like in firefox.

Once you have confirmed the security exception you will be presented with a screen like this.

Obviously as this is the first time you are visiting this or any other registration page you should click on the register button.

You will then be presented with a screen like this.


First click the yes radio button. All this is doing it giving them permission to check your callsign against external sources like QRZ, Offcom etc.
Now enter your callsign IN CAPITALS
Your full name as it appears on your license.
A valid email address (this is important in case you forget your password etc and need to retrieve your information).
A password (WRITE IT DOWN or keep it safe by another means YOU WILL NEED IT AGAIN)
Repeat your password (WRITE IT DOWN or keep it safe by another means YOU WILL NEED IT AGAIN)
Just in case you didn't get how important it is to remember your password, I will say it again.
(WRITE IT DOWN or keep it safe by another means YOU WILL NEED IT AGAIN)
Once you have checked that your details are correct and have checked them again (It isn't easy to make changes if you do make a mistake) you can then click on OK.

You will now be asked if you are sure you want to submit these details.


Obviously if you are sure that your details are correct you press OK
If you are not sure then click Cancel and go back and make sure they are correct.

When you click OK you will be presented with a screen like this (I have obviously redacted my information) that will contain your callsign, name and e-mail address.


Step 1 is now complete, I hope it wasn't too painful and I explained it clearly.

Step 2.

This is the easiest or the hardest step depending on how you look at it.

Now you have to wait for the administrator to approve your registration which can take anywhere from a few hours to about three days (patience is key here).
There is nothing you can do except wait on the administrator and periodically check to see if your registration has gone through.

Here is what it will look like before your registration is approved. Remember that your callsign is in capitals and your password is case sensitive (You see why you must remember your password now).
You will not in 99.9% of cases get an email or any other notification that your registration has been approved other than going to the same website and trying to login.


Step 3.

So now you wait a bit longer until you see something like this when you login and your registration is almost complete. It is now only dependent on you how long this process takes, but once you have completed this last stage your registration is now complete and you can take full advantage of all of the features that D-Star has to offer.


This is the last but one page to completing your D-Star registration and although it may look simple or complicated depending on your point of view it does contain a couple of gotchas.

1st click the checkbox on the left next to the number 1 it will have your callsign to the right of it.

2nd in the initial box put a single SPACE it won't show but it is important that it only contains a single space. Other characters are used but they are usually for special purposes or testing in special instances none of which you are ever likely to need.

3rd DO NOT PUT A CHECK MARK IN RPT BOX unless you are running a public repeater and have a NOV to run one.

4th in the "pcname" field put your callsign only however THIS MUST BE IN LOWER CASE !
Some people will say to add a - after your callsign and your radio model and while you can it very often causes confusion when setting up your radio and you will wonder why you can only be hear locally and not by anyone not connected to the same repeater as you. So my strong advice is to only put your callsign in the pcname field and save yourself a lot of head-scratching further down the line. You can always add other aliases for say a dongle or a different radio further in the future, but in reality it is not needed at all.

5th If you are sure you have entered all the info as I have laid out in the previous 4 steps you can click on update and you will see a box like this if you have followed my directions.


6th Click on OK

7th  LET ME BE THE FIRST PERSON TO WELCOME YOU TO D-STAR, YOU ARE NOW FULLY REGISTERED AND CAN NOW TAKE FULL ADVANTAGE OF ALL THE WONDERS THAT D-STAR HAS TO OFFER YOU !


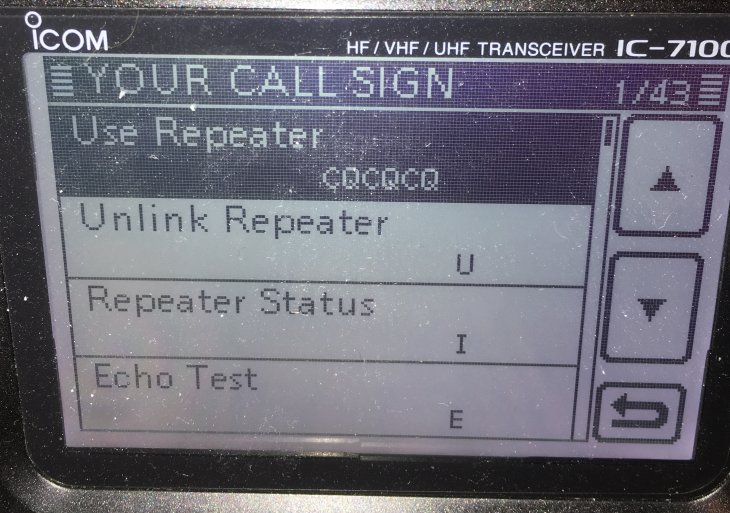
I said this will be a long post and as you can see I meant it. This I think is enough for this post however watch this space for my next installment which will be on setting up an icom IC-7100 but I see no reason why the same won't work for just about any other icom D-Star radio as well.


Teaser:
Part 2 will include:
Programming files,
Reflector lists
Linking to reflectors
Unlinking from reflectors
Information (from the repeater)
Echo test ( Hear what YOU actually sound like as the repeater hears YOU)
Modules and what each one is commonly used for
The status page for your local repeater
Shortcuts to common tasks
and much more

So look out for part 2 of this D-Star series coming soon
With the amount of info to come it may even run into 3 parts

As always if you have any comments then please leave them in the comments section below or email me (my email can be found in the complete about me page although that isn't finished yet).

I really do hope that this has helped you get registered on D-Star and has stopped you from looking at 20 different sites trying to piece all of the information together.
Good Luck.

73's
M0CNL

Air cored inductor calculator v1.16

Have you ever needed to calculate the inductance of a simple air cored inductor for one of your circuits ?

Well I know I have, and having to do all those calculations over and over until i come up with the right combination of diameter, length and wire guage to get the right value in uH can be very time consuming. Or have you ever looked at a circuit and wanted to know the value of an air cored inductor? Yet again I have been there too.

So I came up with this simple but very effective program that will do those calculations for you.

Here are a couple of screenshots.

First the main program itself.


Now the SWG (Standard Wire Gauge) reference chart.


 First you will notice that all the measurements are given in, SWG value, size in metric and the size in imperial measurements.

To make life just that little bit easier, you can even copy and paste the metric and imperial values directly into the main calculator (sorry it doesn't handle SWG values, perhaps that will be implimented in a future version).

If you would like to try it out for yourself the please use the download button below, it is a self extracting archive, but be sure to read the README before "installing".


Download HERE