
I will be doing this mostly with pictures taken of the screen of my icom IC-7100 but the process will be very similar for any other icom radio at least and maybe even other makes of radio that are starting to make D-Star compatible radio. Sorry about the quality of the pictures but it isn't easy to get high quality images in the time constraints I have without getting the reflection of the lights behind me, and they show up every speck of dust in the radio even though I dusted it beforehand.
Firstly you need to put your radio into digital mode which can be done in a couple of ways but the easiest way on the 7100 is by pressing the DR button just below the screen.

I have highlighted the button I mean here with a red "circle" around it.
Next we need to choose our local repeater that we intend to use.
Please ignore that my radio is already setup to use this repeater.
We select the repeater we want to use by touching the screen where in my case it says "CLACTON ON SEA" which is the from field.

This will then bring up a menu where you will use one of two options depending on whether you have a GPS device attached. I am going to go through the process as if I don't but will add a note for those of you that do.

Here we will select "Repeater List" which will then bring up a further menu.
If you have GPS attached you can use "Near Repeater" which will bypass the next step.

As the repeater I intend to use is a 2m UK repeater I will select option "03:"
This now presents us with a further menu.

Here I have scrolled through the list until I found the repeater I want to use which in this case is "GB7TE"
I then press the screen on the repeater I want to use and now the "FROM" field is populated with all the information for that repeater as can be seen below.

Now as I want to be heard on any other repeater that the repeater is connected to via a reflector I need to setup the "TO" field.
Don't worry if your repeater is not connected to a reflector as I will cover that later as in this section I am concentrating on getting you setup to use the repeater.
Where it says "Use Repeater" which in my case here is already setup but we will be supposing it isn't.
So press the screen where it says "Use Repeater" and you will see a new menu.

Here you will click/press on "Your Call Sign" which brings up another menu.
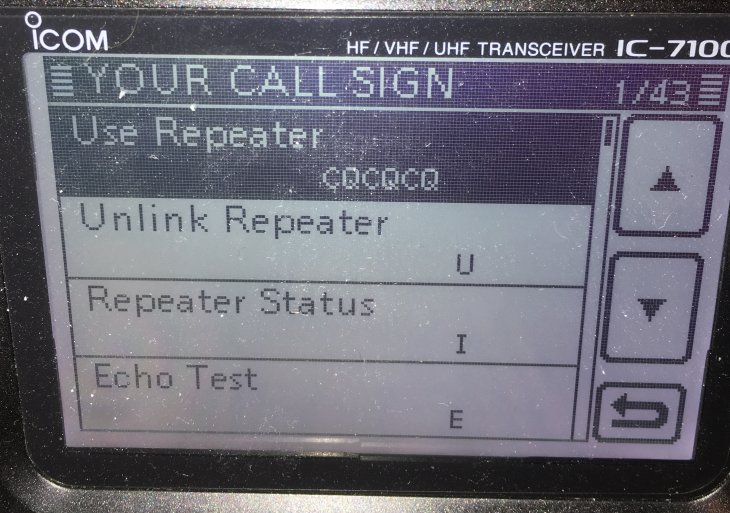
Here we want to use the repeater so we click/press on "Use Repeater"
Don't worry about the other options as I will explain those in a later part.
We will now be brought back to our main screen and are now all setup to use this repeater and for our "signal" to go out over any other repeater that this one is connected to via a reflector.
Here is what your screen should look something like.

Now you are ready to use the repeater and any reflector it happens to be connected to.
In the next part I will be showing you some of the more useful commands that you can send to the repeater that will help you or help connect you via different reflectors.
I hope you have found this series useful so far and as always if you have any comments or questions then please feel free to contact me and I will do my best to help you.
My contact details can be found on the full about me page.
All The Best
73's
Until the next part
Paul
M0CNL
No comments:
Post a Comment